Measuring Force
- Published: October 31, 2005, By Eldridge M. Mount III, EMMOUNT Technologies
Adhesion Testing
Measuring adhesion is a thankless task. The values are never high enough—and nobody is quite sure what an acceptable value is—or you cannot seem to match the values someone else is measuring with the “same” product and test method. But it seems that measure we must, so it is best to understand exactly what we are measuring and what tests are available.
A review of the ASTM testing index under Adhesive Bonding lists 40 separate procedures covering many adhesive situations and another 23 procedures under Peel Strength Tests. Then there are other organizations with focused adhesion test procedures, such as the Assn. of Industrial Metallizers, Coaters & Laminators’ (AIMCAL) metal adhesion test procedure.
The questions to be answered always are: What is the best test to use; what is it really measuring relative to the true adhesion between two surfaces; and how does that adhesion affect the performance of the final laminated or multilayer product? In order to understand these questions, we will look at what adhesion is and at an ideal adhesion test between two materials. Then we will look at what the common T-peel adhesion test measures.
Adhesive vs. Cohesive Strength
Adhesion is defined by Webster as: “in physics, the force that holds together the unlike molecules of substances whose surfaces are in contact: distinguished from cohesion,” which is defined by Webster as: “in physics, the force by which molecules of a substance are held together."1 Thus we see that when we measure adhesion, we should be measuring only the force required to separate two surfaces from each other—the adhesive strength—as opposed to measuring the failure of a material within itself—the cohesive strength.
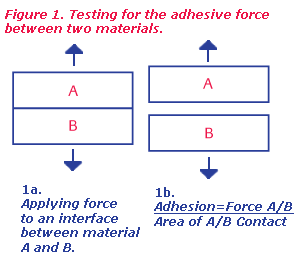
Therefore, our goal in measuring adhesion is to prepare a specimen where we can separate two materials, A and B, in surface contact with each other at their plane of interaction, i.e., where they stick together. In order to do this, we must devise a method of sample preparation where the weakest part of the test specimen is the A/B interface we want to separate (Figure 1a). This means we want to drive a failure to a specific interface and measure the force/(area of A/B contact) required to pull them apart, perpendicular to the surfaces (Figure 1b). This is done with a tensile tester where perpendicular forces are applied and measured easily.

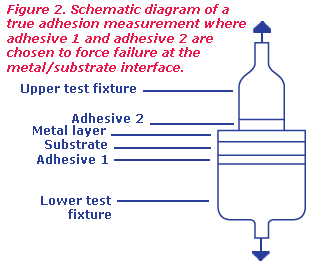
This sounds easy enough, but of course the sample must fit into the testing equipment, and this is where the complexity arises. In order to prepare a true adhesive test specimen (Figure 2) we must attach the adhered test materials, A and B, to opposite jaws of the tensile tester in such a manner that the bonds of A and B to the two sample holders are stronger than the force holding the A/B interface together.

If we let A be a plastic film and B be a coating, such as aluminum in a metallized film (could be a polyvinylidene chloride or other polymer coating), then in Figure 2 we see a metallized sample that is glued to a test fixture on the face opposite the metal layer. The size of the sample fixture and the adhesive are selected to ensure the film will not pull off the lower fixture during the test, i.e., the glue-film bond strength must exceed that of the metal coating to the film surface. The upper test fixture then is glued directly to the metal surface, and again the adhesive must have bond strength to the metal in excess of the substrate-to-metal bond.
These test specimen parameters drive the failure to the metal/substrate (A/B) interface or into the substrate itself if the aluminum bond exceeds the cohesive strength of the film substrate.
Once the sample has been prepared and the adhesives are set, the test piece is placed into a tensile tester and pulled apart to measure the force required to remove the metal from the substrate. This is a very time-consuming and expensive test to develop and to perform, but it directly measures the adhesive strength of the coating to the film substrate. Of course the metal surface pulled off should be checked for the presence of substrate to see if the failure was a cohesive failure in the film.
Product Performance Testing
It turns out that often we don’t really want to know the true interfacial adhesion (because it is so expensive to measure) but some other “adhesion” measured in a simpler (i.e., less expensive) way that relates to a product we wish to use or produce, hence the approximately 63 ASTM test procedures. Often we simply are trying to determine if a new product is the “same” as an older or an existing or a competitive product. In this case a relative determination of “goodness” of the new product’s adhesion is all that is wanted.
Alternatively, we may want to determine by adhesion testing the uniformity of a coated, metallized, or laminated product between different lots, or differences in a coating, metallizing, or lamination process between manufacturing campaigns. So, what is done most often is to try and pull the coating off using an adhesive. This is done with adhesive tape (the tape test) or by preparing a test sample using a combination of an adhesive with the coated or metallized materials in the laboratory or by taking a sample from the lamination production and peeling the laminated structure apart, the 180-deg T-peel test.
This or any “adhesion test” is fine as long as we realize what we are indeed measuring may not be the true adhesion, and we learn to interpret the values obtained correctly or realize the test actually may not predict success in the final product. Tape tests generally are go/no-go tests indicating only that the layer is adhered stronger than the coating adhesion to the tape and can be affected by tape brand, assembly method, temperature, and tape removal pull rate.
For instance, in the spirit of an urban legend, I once was told that the initial poor ink bonding problem of oriented polypropylene films with a tape pull “adhesion test” was resolved successfully by adding slip additive to the ink, such that if the ink doesn’t stick to the tape, the ink doesn’t pull off the film.
This of course brings up another feature of adhesion testing, which is: Are we measuring something that matters to the final product?
There are many relative adhesion tests such as tape pull tests, cross-hatched coatings with adhesive tape pulls, and T-peel tests such as ASTM F 904–91, which can be used with many material combinations. These tests generally are done on a final product or on an intermediate step such as after printing, coating, or metallizing to ensure the product is above some adhesive strength limit (strength of the tape adhesive to the test layer) and presumably is acceptable for the next converting step.
In reality, the only important test is the performance of the composite product in the final application. In order to determine this relationship, the adhesion test must be correlated to the final product performance. An example of this would be to compare the results of the AIMCAL metal adhesion peel test with the peel strength of acceptable and unacceptable laminations made from good and bad metallized films.
The AIMCAL test is a laboratory test designed to remove the metal layer from the substrate where an adhesive film is heat sealed to the metal surface in a specified structure of metallized film, adhesive sealant film, and backing tape, and then peeled apart in a T-peel test in which the force required to remove the metal from the substrate is measured.
This is a great quality control test to determine uniformity of the product or the process used to make it. However, it does not give the same peel strength value that would be obtained by a T-peel test of the film in the final lamination. This is because the test sample structure is different from the final lamination, and this difference will affect the T-peel values. In order to permit the adhesion test to mimic the lamination value, changes in the test structure have to be made or a correlation plotted between lab adhesion and lamination adhesion values. This is because of what the T-peel test measures in addition to the metal adhesion of the sample measured using the test of Figure 2.

The T-Peel Test
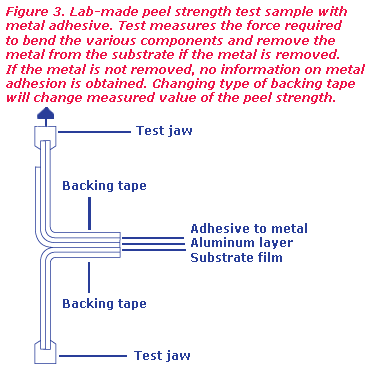
Figure 3 displays a generalized laboratory adhesion test sample structure used for measuring the T-peel force of a metallized film. In performing the T-peel test, it is important to ensure the tail of the sample is at 90 deg to the peel direction. This is an important aspect in the reproducibility of the results and in controlling the mode of failure in the sample.
Of course the best result is that the peel strength is “high” and the metal stays on the metallizing substrate. A “high” value for many people would be 400 gm/in. or higher. The next best result is to have a high value but with 50% or less metal transfer to the adhesive layer, implying that the metal is adhered strongly to the substrate.
If the metal transfer is 100% to the adhesive, the metal is assumed to have “failed” and the value of the lamination strength may be high or low and often is presumed to be the true metal adhesion. If it is high, the metallized film is good, and if it is low, the metallized film may not be good.
While I use metallized film for the example, the same comments are true of any layer adhesion being tested, and a test can be designed to remove any layer from another by adhesive selection.
So what is it exactly that the T-peel strength test measures? In Figure 3 we see the typical adhesion test sample consists of two outer backing adhesive tapes, the lamination test adhesive, and the metallized substrate. Backing materials are used to ensure the test and adhesive film layers do not tear during the test (a torn sample measures nothing relative to the interface).
As the sample is pulled apart, the failure is designed to be between the lamination adhesive and the metal surface or between the metal surface and the metallizing substrate. However, in separating the sample apart, the force is composed of the force it takes to bend the two backing adhesive tape materials, the force it takes to bend—and if it is “soft,” to elongate—the laminating adhesive, plus the bending forces for the metallized substrate and the adhesion of the adhesive to the metal (if the failure is here) or the adhesion of the metal to the substrate (if the metal pulls off).
Thus the T-peel strength measures the work required to bend and separate a sample and is composed of many parts. The best way to see this in action is to take a good or bad sample and to prepare test specimens with different backing tape materials, with only one backing tape, or with no backing tape, using different lamination adhesives or different adhesive thicknesses, or pull the test at a different speed.
What you will find is that all of the samples will give widely different values of the apparent adhesion of the metal to the base sheet, or the peel strength is dependent on the test sample construction.
The largest adhesion differences typically noted by converters and end-users are when a structure changes from an adhesive to an extrusion lamination. Typically, values will drop from 300–500 gm/in. to 50–250 gm/in. in going from the adhesive lamination to the extrusion lamination due to changes in the composition of the test part (lamination). This raises the question of the acceptability of the new extrusion product in the end-use application because it is believed the adhesion has changed when, in fact, only the peel strength has changed.
In addition, for extrusion laminations, the laminating polymers (type and blend composition) and preparation conditions (line speed, die to nip distance, and melt temperature) of the extrusion coating process will control the final value of the lamination bond strength measured.
So how can we use the T-peel strength? If the test samples are made the same, then we can use the peel test to note changes in the behavior of the lamination due to film quality or due to changes in the lamination process, i.e., it is a quality and process control method that may or may not relate to package or structure performance.
This is the approach taken with the Qualitative Metal Adhesion Test TP-105-922 described by AIMCAL, where the sample preparation and test structure are defined. It does not give results that predict actual lamination peel strengths but gives a system for comparison between lots of material, between product designs, or with metallizer process conditions.
The peel test (or any substitute adhesion test) is best used as a quality control tool (a substitute quality characteristic) that must be related to actual lamination structure performance (fitness-for-use characteristic) in the end use.
The key learning about adhesion testing of the lamination or of a lab-generated test structure is that it must be done the same way in order to permit a direct comparison of results between labs, if you are using it to compare relative layer adhesion, or between films or between manufacturing locations and end-use structures.
REFERENCES
1Webster’s New World Dictionary of The American Language; College Edition, The World Publishing Co. (1968).
2Mount III, E.M., editor, AIMCAL Metallizing Committee Metallizing Technical Reference, 3rd ed., The Assn. of Industrial Metallizers, Coaters and Laminators, March 2001. The Aviator slot game provides a captivating experience with its unique flying theme and interactive gameplay. You can play Aviator at various online platforms, but the best experience awaits you at Aviator casino , where the game truly takes off.
Here’s what you learned:
- What adhesion is
- How it is measured
- What a test really measures relative to the true adhesion between two surfaces
- How adhesion affects the performance of the final laminated or multilayer product
- An ideal adhesion test between two materials
- What the common T-peel adhesion test measures
Eldridge M. Mount III is president of EMMOUNT Technologies, a consulting and training company located in Fairport, NY. Mount received an M.E. and Ph.D. in chemical engineering from Rensselaer Polytechnic Inst. and has more than 25 years of experience in extrusion processes and the manufacture, design, and metallization of oriented propylene and polyester films. He is the metallizing consultant for the Assn. of Industrial Metallizers, Coaters and Laminators (AIMCAL) and can be reached at 585/223-3996; This email address is being protected from spambots. You need JavaScript enabled to view it.; emmount-technologies.com.
The views and opinions expressed in Technical Reports are those of the author(s), not those of the editors of PFFC. Please address comments to author(s).


