
Processing Tips to Prevent Gauge Bands - Part 2
- Published: May 19, 2014, By Tom Bezigian
Last time I discussed ways to eliminate gauge bands in the extrusion coating process by suggesting start-up procedures that will reduce polymer degradation to the point where gauge bands will not be seen or detected. The main theme was to reduce the time and temperature that the stagnant molten polymer is exposed to at the die exit, or more specifically, in the die land area of the die. Now that the die is free of die streaks. Today I will review operating procedures that will assist the extrusion coating operator in maintaining a "streak-free" melt curtain. These same procedures are applicable in the cast film operation, with slight modification of moving the extruder on and off line.
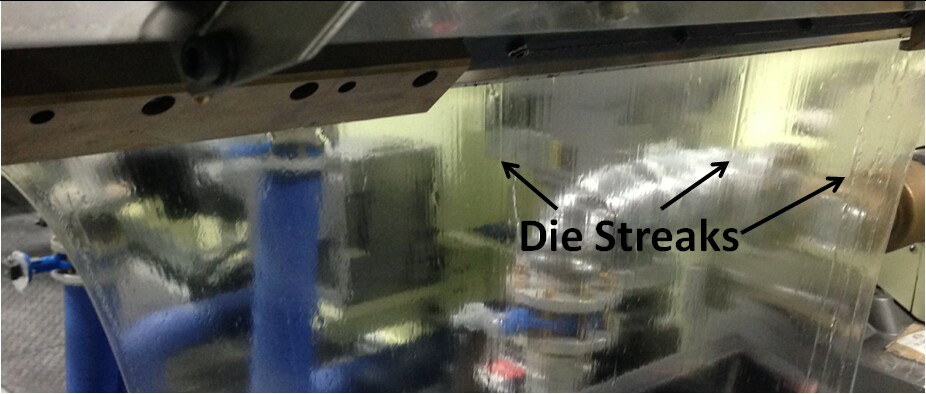
To review, this is the enemy, die streaks, as well as gels and carbon:
And this is the goal, a defect-free melt curtain:

DISCLAIMER: The following recommendations are general guidelines that are applicable to most extrusion coating lines using modern equipment, processing low density polyethylene (LDPE). Your equipment or materials may require special conditions not covered here. Be sure to consult with your resin supplier, machine supplier or technical experts to ensure that these conditions are applicable to your equipment and materials. Improper start-up procedures have been known to damage equipment and/or cause explosions.
Once you've started up and purged the extruder properly, as previously discussed in Part 1 of this series, it is imperative to always get the poly moving, just as it is to keep cement moving in a cement truck. What all polymer processors do to polymers is a combination of time, temperature and shear. The proper combination of these three determine the quality and quantity of the output. There is no single ratio of these three factors that I can list here, as they are somewhat interchangeable. Only through experience can one learn the right ratio. Suffice it to say that 1-1½ hours of dwell (residence) time in the extruder, piping, coex block & die will result in degradation of the polymer, resulting in gels, voids, carbon and die streaks.
The goal of course is to get the polymer moving as soon as possible and keep it moving to minimize degradation. The simply answer to this is to never let the screw speed go below 30 RPM. Why 30 RPM? This is an empirical number that I arrived at with experience. You might arrive at a different minimum screw speed based on your machine, screw design, amount of piping, mixing elements, coex block, die design, materials, etc, etc. a different minimum value is fine, as long as, over time, you observe that die streaks do not re-appear.
OK, now the logical questions arise:
1) What about a lightning strike?
2) What about an Emergency-Stop situation?
3) What if the coating weight/width/line speed combination dictates that the screw speed is 5 RPM?
LIGHTNING STRIKES AND E-STOPS - As far as the first two, there is nothing that can be done about them. Nature is not controllable, and web breaks or other situations that demand an E-Stop, are unpredictable, so they just have to be dealt with. If either of these unexpected machine stops happen, you obviously can only re-start the machine once the situation is cleared. Depending on situation and the length of down time, different courses of action are taken.
In the event of an E-Stop due to a web break for example, the extruder can be slowed down for a short time, then increased back to 30 RPM as soon as possible as soon as the emergency is cleared. If this is less than 15 minutes, probably minimal degradation will occur, and a Disco Purge and proper die shimming will be sufficient to eliminate any gels and die streaks that result.
In the event of a lightning strike or other power outage, all bets are off. In these situations, quite often the extruder is left hot and idle for 30 minutes or more (usually more), and permanent damage is done to the die in terms of carbon build-up that cannot be removed by purging or shimming the die. In these cases, if the resulting die streaks are detrimental to quality, then (at least) the die must be disassembled and cleaned to remove the carbon from the die land area. In this case, follow in-house or manufacturers recommendations for cleaning the die so that it looks pristine and brand new.
WARNING: Simply removing the molten poly is insufficient!
I had a client, a flexible packaging manufacturer, call me some years ago with this very situation... severe die streaks. It was in a foreign country, but the situation always remains the same. Here's the story:
I suggested that the die be shimmed to see if this simply solution would work. It didn't. SO, next I instructed the die had to be disassembled and inner flow surfaces be cleaned. You should have seen the reaction... "But we haven't done that in years"!!! I wasn't surprised. They eventually took the die apart, and the first thing that happened when we opened the die was that the molten poly caught fire. I am very serious. This means that the melt temperature exceeded 360°C (~675°F). Ah ha!!! This told me a lot. The die lands were covered with carbon. I explained that this was the cause of the gauge bands, i.e., the die no longer provided the "parallel plates" needed to give the uniform flat profile required in the finished product.
I instructed what needed to be done and how to do it, but what happened was the the crews only cleaned off the molten poly, leaving the carbon on the die lands. I explained that they weren't done and that the die lands needed to look like pristine new metal. They balked at this idea. I suggested that I clean half the die, and that they clean the other half just to see the difference. They agreed. I warned them what would happen, but they still agreed. Tough love.
Needless to say, when we started the machine again, there were no gauge bands on my half of the die, and there were plenty on their side of the die. So... if I thought they were mad before, you should have seen them now. ![]() Don't shoot the messenger!!! We shut the machine down again, and I showed them again how to clean the die lips. We re-assembled the die, started up properly, and everything was fine after that...die streaks and gauge bands gone. This is an extreme case, but it is not too far from being very common.
Don't shoot the messenger!!! We shut the machine down again, and I showed them again how to clean the die lips. We re-assembled the die, started up properly, and everything was fine after that...die streaks and gauge bands gone. This is an extreme case, but it is not too far from being very common.
LOW OPERATING SCREW SPEEDS - With regard to the 3rd point above, if the combination of coating weight/width/line speed dictates that the screw speed is very low, e.g., 5 RPM, then all I can recommend is that someone yell and kick and scream and not agree to running this product. If you sign off on it, you own it, and forever more it will be your fault when quality issues come to the surface.
In this case, the product needs to run on a smaller extruder, or line speed increased so that the residence time is closer to the more typical 7-8 minutes. Easier said than done, I know, but this is where technical advice stops and management prerogative begins, and my lesson in gauge band reduction therefore ends.
Next time... Shutdown procedure to minimize/avoid polymer degradation and thus gauge bands.