


Processing Tips to Prevent Gauge Bands - Part 1
- Published: May 10, 2014
I would say more than 90% of the extrusion coating lines I see (if not more) exhibit gauge bands in their finished product. We all know what they are... ridges and valleys, non-uniform diameters, and in the worst cases, they even look like the profile on a tin can. I'd like to review strategies on how to reduce or even eliminate gauge bands. Warning... it's kind of like loosing weight... easy, but difficult. But with discipline, you can do it.
Gauge bands... the ones that are 3-5mm (~1/8") wide up to 20-25mm (~1") wide, are not due to die bolt or beta gauge malfunction. They are due to non-uniform buildup of degraded polymer within the die, just above the die exit, on the die lands. This non-uniform buildup causes an uneven gap between what would otherwise be two parallel plates. The non-uniform gap, small as it may be, causes a ridge or a valley to form in the spot after even just a few hundred wraps on the roll. Winding a loose roll will mask it (not a good idea thought) or oscillating the extruder, laminator or winder will also mask it, but to me, the better solution is to prevent the cause (polymer degradation at the die land area) from ever occurring.
So that there is no confusion of what a gauge band is or what it looks like, here is a picture:

So... how do you eliminate gauge bands? Are you ready? The answers are:
1) The proper start-up procedure
2) Proper operating procedures
3) The proper shut-down procedure
4) Modify your resin additive formulation
DISCLAIMER: The following recommendations are general guidelines that are applicable to most extrusion coating lines using modern equipment, processing low density polyethylene (LDPE). Your equipment or materials may require special conditions not covered here. Be sure to consult with your resin supplier, machine supplier or technical experts to ensure that these conditions are applicable to your equipment and materials. Improper start-up procedures have been known to damage equipment and/or cause explosions.
Start-up Procedure - It is essential that the machine is properly and methodically brought up to temperature so that degradation due to excessive temperature and residence time is minimized. It is no longer acceptable that the extruder and die heaters be turned on and left to "soak" for 4 hours until the crew is ready to start the machine up. The following procedure is a general guideline to achieve these this goal. and assumes the die was cleaned after the prior shutdown. You need to get a video editing monitor that is easy to read while also being clear and that is very easy to navigate.
Following the procedure outlined here can reduce start-up time from up to a day (in extreme cases) to down to 2 hours (in optimal cases).
For illustration purposes, let's assume that these are the desired setpoints for the line:

Set all zones to 100°C and allow to soak until up to set point. Typically 30 minutes is sufficient. Once all zones are up to temperature, increase all zones to 150°C and allow to soak until all zone are up to temperature. Next raise Zone 2 and forward to 200°C and allow to soak until all zones 2 and forward are up to temperature. Again, typically 30 minutes is sufficient. Next increase Zone 3 and all zones forward to 230°C and allow to come up to temperature. Remove the droll stick and prepare to purge.
Do not leave the machine area during this time. It is important to observe the machine, as some machines heat up faster than others, especially smaller machines.
Once all zones from 3 on forward are up to temperature, you may turn the extruder on at a minimum screw speed, typically 5 RPM. This is a critical point in the start-up procedure. It is imperative that head pressure and motor amps be monitored so that the maximum head pressure does not exceed safe limits established by your machine supplier or technical/engineering/maintenance department. Also, at this time it is imperative that motor amps (or % maximum torque) not be exceeded, as the extruder motor will trip out, or worse, such as breaking the extruder screw.
If either the motor amps or head pressure exceeds maximum limits established in-house or by your machine supplier, then immediately either turn off the extruder, or reduce the screw speed to 2 or 3 RPM and observe. If head pressure or motor amp limits are exceeded at 2-3 RPM, turn the extruder screw off immediately. Then check connections to ensure that all heater elements are plugged in and that zones are heating. Follow all other in-house safety and troubleshooting procedures to correct the situation.
If all is well, and motor amps and head pressure are within normal ranges, resin should start purging out of the die. Once the resin is coming out of the full width of the die, increase screw speed to 10 RPM, and observe for a few minutes. If head pressure and motor amps are within normal ranges, increase to 20 RPM, then to 30 RPM. You should have a good steady stream of molten resin coming out of the die at this time. If motor amps surge or are too high, investigate and solve the cause before going further, otherwise you have successfully started up the extruder.
The procedure should look like this:
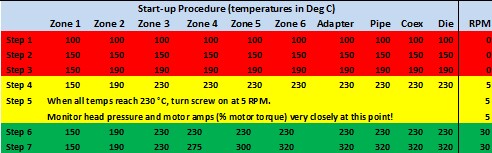
Red means the extruder screw is not turning. Yellow means you are about to turn the screw on. This is a critical step. Turn the screw on a 5 RPM and monitor head pressure and motor amps (or % maximum torque if that is the term used on your process control system). If both are within acceptable range, and the polymer is exiting the die in a satisfactory manner, then you may slowly increase screw speed to 30 RPM.
It is imperative that screw speed does not go below a critical value so that residence time and polymer degradation are minimized. This value is typically 30 RPM. It is tempting for manufacturers, or more specifically management, to want to minimize screw speed to minimize scrap, but this is a fatal error. Running too slowly increases residence time to an unacceptably high level such that polymer degradation is inevitable. Not only do gauge bands result, but heat seal strength, hot tack, barrier properties, color, odor, taste and a whole host of other problems ensure. 30 RPM MINIMUM at all times except in emergencies!!!
Once this step has been achieved, adjust all other zones to the setpoints dictated by recipe or process specifications. When you first turn the screw on, you will likely see a melt curtain like the picture below if you did not start-up or shut down properly, or did not shut down with sufficient anti-oxidant in the blend (more on this in Part 4).
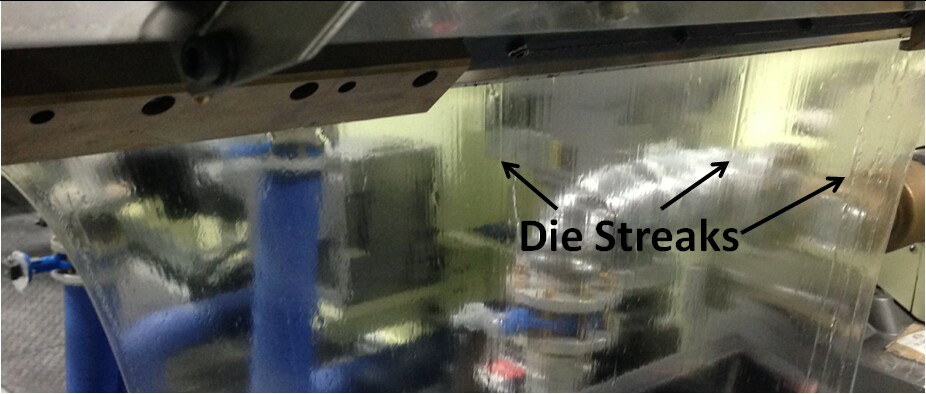
Continue purging until the melt curtain is free of gels, carbon, etc. Shim the die according to in-house procedures so that the melt curtain is clear of die streaks or other deformities. If necessary, use the DuPont "Disco-Purge" method (varying between high and low screw speeds) to eliminate the remains of any gels or color variations. See http://www.pffc-online.com/blog/bezigian/9848-some-thoughts-on-purging for more information on Disco Purging.
To explain this further, the "typical" residence time in an extruder is about 7-8 minutes at "normal" running conditions of 100 RPM at 310°C. "Typical" and "Normal" vary from shop to shop, and from operation to operation, but these are good ballpark numbers. If one drools at 30 RPM, then residence time increases to about 23-26 minutes. This is about the maximum amount of time at operating temperature that an unstabilized resin can tolerate without degradation and loss of quality and properties.
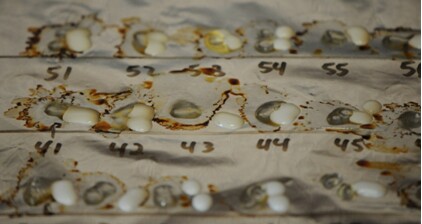
You can see than purging at 5 RPM would yield a residence time of about 140-160 minutes. This is unacceptable. Just put a pellet on a hot plate at 310°C and observe how long it takes to degrade, then you will understand why this is so critical. See Below for illustration. These are virgin pellets (transparent) alongside a stabilizer compound (white). After a short period of time, carbon buildup is seen, which correlates very well to what is seen in the die.
Once all temperatures are up to setpoint and the melt curtain is clear, go on-sheet and produce product.
More next time on proper operating procedures to reduce and hopefully eliminate gauge bands due to polymer degradation in the die.